
Get Crafty: Fun & Safe DIY Pet Accessories You Can Make Today
Estimated reading time: 11 minutes
Key Takeaways
- Creating DIY pet accessories lets you tailor items perfectly to your pet’s needs while ensuring safety.
- Homemade pet gear can be significantly more cost-effective than store-bought options.
- DIY allows you to choose non-toxic, durable, and natural materials for your pet’s accessories.
- Repurposing materials for DIY projects is an eco-friendly practice that reduces waste.
- Crafting for your pet provides creative satisfaction and can strengthen your bond.
- Safety is paramount: Always prioritize strong hardware, proper fit, non-swallowable parts, and breakaway collars for cats.
Table of Contents
- Get Crafty: Fun & Safe DIY Pet Accessories You Can Make Today
- Key Takeaways
- Why Create DIY Pet Accessories? The Many Benefits!
- Project Idea 1: Cozy Corners – DIY Dog Beds
- Project Idea 2: Satisfying Scratches – Homemade Cat Scratching Posts
- Project Idea 3: Stylish & Safe Strutting – DIY Pet Collars
- Project Idea 4: Engaging Entertainment – How to Make Pet Toys at Home
- General Tips for DIY Pet Accessory Success
- Conclusion: Get Crafting for Your Happy Pet!
- Frequently Asked Questions (FAQ)
Do you love spoiling your furry friends? Most pet owners feel great joy when pampering their pets and always want the very best for them. Giving them treats, toys, and comfy beds is one way we show how much we care.
Creating DIY pet accessories is a truly wonderful way to show your love. It lets you make special items just for your pet, and you can be sure they are safe. When you make things yourself, you can perfectly match them to your pet’s unique size, personality, and needs. Maybe your dog is a super chewer, or your cat only likes tall scratching posts? DIY lets you make exactly what they need!
Making your own pet gear has many plus points. You can save money, make items that fit perfectly, use materials you know are safe, help the planet by recycling, and have lots of fun being creative!
This post will guide you through making different kinds of homemade things for your pets. We’ll cover ideas for:
- Cozy beds for dogs to snuggle in.
- Satisfying scratchers for cats to stretch and sharpen claws.
- Stylish and safe collars for walks and identification.
- Fun and engaging toys to keep them happy and active.
Let’s get started on making some amazing DIY pet accessories for your beloved companion!
Why Create DIY Pet Accessories? The Many Benefits!
You might wonder why you should spend time making things for your pet when you can just buy them. Well, crafting DIY pet accessories comes with lots of great advantages that both you and your pet will appreciate. Let’s explore why it’s such a fantastic idea.
- It Saves You Money (Cost-Effectiveness): Pet supplies can be expensive! Making your own accessories is often much cheaper. You can use things you already have around the house, like old t-shirts, worn-out pillows, leftover fabric scraps, or sturdy cardboard boxes. Instead of throwing these things away, you can turn them into something useful and fun for your pet. This means less spending at the pet store and more money in your pocket. It’s a smart way to give your pet nice things without breaking the bank.
- Sources: Netmeds, Gimars Pet
- You Get the Perfect Fit (Perfect Customization): Have you ever bought a dog bed that was too small, or a cat toy your kitty ignored? With DIY, you can make things exactly right for your specific furry friend. You can tailor accessories to match their size perfectly – whether you have a tiny chihuahua or a giant Great Dane. You can think about their breed and age – an older dog might need a softer bed, while a kitten needs smaller toys. You can even customize based on their habits, like making an extra-tough toy for a dog who loves to chew powerfully, or a tall scratching post for a cat who enjoys a big stretch. Homemade means made-to-measure!
- Sources: CPR Certification Now, Dr. Pashu
- You Control the Materials (Material Safety and Control): Sometimes, store-bought pet items contain hidden chemicals or materials that might not be safe if chewed or licked. When you make your own DIY pet accessories, you are completely in charge of what goes into them. You can choose materials that are non-toxic, strong, durable, and safe for your pet. For instance, you might choose natural materials like organic cotton or wool. These are often hypoallergenic, meaning they are less likely to cause allergies, gentle on pets with sensitive skin, and better for the environment too. Knowing exactly what your pet’s bed or toy is made of gives you great peace of mind.
- Sources: Hiro + Wolf, Honest Pet Products
- It’s Good for the Earth (Sustainability & Eco-Friendliness): Making things yourself is often a greener choice. By repurposing old items – turning that unwanted t-shirt into a dog toy, using an old blanket as bed stuffing, or making a cat fort from delivery boxes – you are reducing waste. Less stuff goes into landfills, which is great for our planet. It lowers the environmental “paw print” that comes with owning pets. Choosing sustainable crafting is a responsible way to care for your pet and the Earth at the same time.
- Sources: Gimars Pet, Dr. Pashu
- It Feels Good and Strengthens Your Bond (Creative Satisfaction & Bonding): There’s a special kind of happiness that comes from making something with your own hands, especially when it’s for someone you love – including your pet! Seeing your dog happily snooze in the bed you made, or your cat playfully bat at a toy you created, is incredibly rewarding. The process of crafting can also be a fun activity in itself. This shared experience, even if your pet just “supervises,” can strengthen the special connection you have with your animal companion. It’s a loving act that benefits both of you.
- Source: CPR Certification Now
So, as you can see, making your own pet accessories is more than just a hobby; it’s a practical, safe, eco-conscious, and heartwarming choice!
Project Idea 1: Cozy Corners – DIY Dog Beds
Every dog deserves a comfy spot to rest and dream. Making your own DIY dog beds is a fantastic project that lets you create the perfect snuggle zone for your canine pal. You can tailor it to their size and your home’s style. Here are a few ideas, from super simple to slightly more involved:
Easy Ideas for Homemade Dog Beds
- No-Sew Fleece Tie Bed: This is one of the easiest beds to make!
- What you need: Two large pieces of fleece fabric (choose fun patterns!), sharp scissors, and stuffing (like polyester fiberfill, old pillows, or clean blankets/towels).
- How to make it: Lay the two pieces of fleece on top of each other, making sure they are lined up nicely. Cut out a square from each corner (maybe 4-5 inches, depending on the size). Then, cut strips about 1-2 inches wide and 4-5 inches long all around the four edges of the fabric, cutting through both layers at once. Now, start tying the top strips to the bottom strips using double knots. Keep going around all sides, but leave one side open for now. Stuff the bed with your chosen filling until it’s plump and comfy. Once stuffed, finish tying the knots on the remaining side. Fluff it up, and it’s ready for your pup!
- Repurposed Pillow, Duvet, or Sweater Bed: Give old bedding or clothing a new life!
- What you need: An old pillow (or several for a bigger bed), an old duvet insert, or a large, thick old sweater. Optional: needle and thread, extra fabric for a cover.
- How to make it (Pillow/Duvet): This is super simple! Just take an old, clean pillow or duvet and place it where your dog likes to sleep. For extra durability and washability, you can make a simple cover for it. Measure the pillow/duvet, cut two pieces of sturdy fabric (like canvas or denim) slightly larger, sew three sides together, slip the pillow/duvet inside, and sew the fourth side shut (or add buttons/zipper for easy removal).
- How to make it (Sweater): Lay an old sweater flat. Sew the neck opening shut securely. If it’s a cardigan, sew the front opening closed too. Sew the ends of the sleeves closed. Stuff the body and arms of the sweater with fiberfill, old towels, or other soft materials through the bottom opening. Once it’s nicely stuffed, sew the bottom hem of the sweater closed. Voila! A cozy sweater bed.
- Simple Wooden Frame Bed: This looks stylish and gets the bed off the floor.
- What you need: Four pieces of wood planks for the sides (like 1×4 or 1×6 boards), screws or nails, sandpaper, wood glue (optional but good), measuring tape, saw, drill. A cushion (bought or homemade) to fit inside.
- How to make it: Decide how big you want the bed frame to be (measure your dog!). Cut the wood planks to create a rectangular or square box frame. Sand all the wood pieces really well, especially the edges and corners, to make sure there are no sharp bits or splinters that could hurt your dog. Assemble the frame by screwing or nailing the corners together. You can add wood glue for extra strength before fastening. Let it dry completely. You can paint or stain the frame with pet-safe paint/stain if you like (make sure it’s fully cured and doesn’t smell before use). Finally, place a comfy cushion inside the frame. This design helps keep the cushion contained and elevates your dog slightly off drafty floors.
Key Considerations & Tips for DIY Dog Beds
- Fabric Choice is Key: The fabric you choose needs to stand up to doggy use.
- Good options: Heavy-duty cotton canvas, denim, or strong upholstery fabric are excellent choices because they are tough and usually machine washable.
- Cozy but consider chewing: Fleece is soft and cozy, great for dogs who aren’t destructive chewers. However, if your dog likes to chew their bed, fleece might get ripped easily.
- Washability: Always try to choose fabrics that can be easily washed, or make a removable cover for the bed. Dogs can be messy!
- Stuffing Makes a Difference: What’s inside matters for comfort and support.
- Standard: Polyester fiberfill (Poly-Fil) is common, easy to find, and washable.
- Supportive: Shredded memory foam provides more support, which can be good for larger or older dogs.
- Eco-Friendly: Using old, clean blankets, towels, or even clothes as stuffing is a great way to recycle. Make sure they are cut into smaller pieces so they don’t get lumpy.
- Older Dogs: For senior dogs or those with joint issues, consider using an orthopedic foam base for maximum support. You can often buy this foam cut to size.
- Get the Sizing Right: A bed that’s too small isn’t comfortable.
- Measure your dog: Watch your dog when they are sleeping. Do they curl up in a ball, or stretch out long? Measure them in their favorite sleeping position and add a few extra inches to ensure they have plenty of room to shift and get comfortable. A bigger bed is usually better than one that’s too small.
Creating a DIY dog bed is a loving project that gives your best friend a special place to call their own.
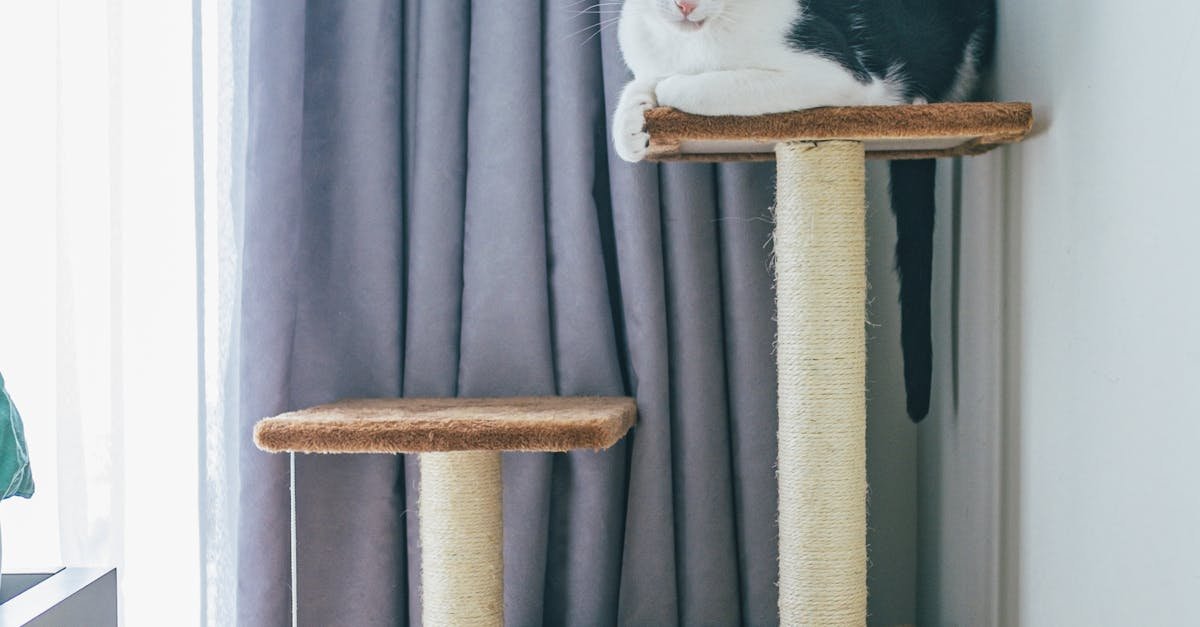
Project Idea 2: Satisfying Scratches – Homemade Cat Scratching Posts
Cats need to scratch! It’s a natural instinct that helps them stretch, mark their territory, and keep their claws healthy. Providing homemade cat scratching posts can save your furniture and make your feline friend very happy. Here are some ideas for DIY scratchers:
Ideas for DIY Cat Scratchers
- Classic Sisal Rope Wrapped Post: This is a favorite for many cats.
- What you need: A sturdy wooden post (a square 4×4 fence post works well, cut to desired height – maybe 2-3 feet tall), a heavy, wide wooden base (like a square piece of plywood, at least 12×12 inches or bigger for stability), long screws, a drill, lots of natural sisal rope (usually 3/8 inch thick is good), non-toxic glue (like basic white school glue or wood glue), and heavy-duty staples/staple gun (optional, but helpful).
- How to make it: Securely attach the wooden post to the center of the base using long screws drilled up from the bottom of the base into the post. Make sure it’s very stable and doesn’t wobble. Start at the bottom of the post. Secure the end of the sisal rope using non-toxic glue and potentially a few staples hammered in flat (make sure no sharp points stick out). Begin wrapping the rope tightly around the post, pushing each row down firmly against the last one. Apply glue sparingly as you go, especially every few rows, to keep it secure. Keep wrapping all the way to the top. Cut the rope and secure the top end firmly with glue and/or staples hammered flush. Let the glue dry completely before letting your cat use it.
- Corrugated Cardboard Scratch Pad: Simple, cheap, and cats often love it!
- What you need: Lots of corrugated cardboard boxes (like shipping boxes), a box cutter or strong scissors, a ruler, non-toxic glue, and optionally a shallow box or wooden frame to hold it.
- How to make it: Cut the cardboard into long strips of the same width (e.g., 3 or 4 inches wide). Make sure you are cutting *across* the corrugations (the wavy lines inside) so the edges are scratchable. Now, you have two options:
- Rolled Pad: Start tightly rolling one strip of cardboard. When you get near the end, apply some glue and attach the next strip, continuing to roll tightly. Keep adding strips and rolling until you have a large, dense cardboard circle. You might want to clamp it or wrap it with string while the glue dries.
- Layered Pad: Take a shallow box (like a shoe box lid or a low-sided wooden box you build). Cut the cardboard strips to fit snugly inside the box when stood on their edges. Pack the strips tightly side-by-side inside the box until it’s completely full. You can add a little glue between some strips if needed. The box helps hold everything together.
- Repurposed Item Scratcher: Get creative with sturdy household objects.
- What you need: A stable item like an old wooden stool leg, a sturdy wooden crate turned on its side, or even a thick log (sanded smooth). Sisal fabric (like a doormat), tightly woven carpet remnants (check for loops that could snag claws), or sisal rope. Non-toxic glue or heavy-duty staples.
- How to make it: Make sure the item you choose is heavy and stable enough not to tip over when your cat scratches. Cut the sisal fabric or carpet remnant to fit the area you want to cover. Attach it securely using non-toxic glue, spreading it evenly. You can also use staples, ensuring they are hammered in completely flush so they don’t snag claws. If using rope, wrap it tightly as described for the sisal post.
Key Considerations & Tips for Homemade Cat Scratching Posts
- Stability is Crucial: This is super important! If the scratching post wobbles or falls over when your cat uses it, they might get scared and never use it again. The base needs to be wide and heavy enough to keep the post upright, even when your cat leans against it or jumps on it. Test its sturdiness thoroughly.
- Use Durable, Cat-Friendly Material: Cats have preferences!
- Top Choices: Sisal rope and sisal fabric are fantastic because their rough texture is very satisfying for cats to scratch, similar to tree bark. Corrugated cardboard edges are also very popular. Hemp rope is another durable, natural option.
- Avoid: Don’t use fluffy carpet, as it can snag claws and doesn’t provide the right shredding satisfaction. Ensure any carpet remnants used have very tight, low loops.
- Sources: Broadland Vets, Honest Pet Products
- Think About Orientation (Vertical vs. Horizontal): Pay attention to how your cat likes to scratch.
- Vertical Stretchers: Many cats love tall, vertical posts that allow them to fully stretch their bodies while scratching. Make sure these are tall enough for your cat to get a good stretch.
- Horizontal or Angled Scratchers: Some cats prefer scratching on flat surfaces on the floor or angled scratch pads. The cardboard pads are great for this.
- Variety is Good: If you can, offer both vertical and horizontal options to see what your cat prefers, or just to give them choices!
- Source: Broadland Vets
Providing great homemade cat scratching posts in the right places (like near where they sleep or near furniture they used to scratch) will keep your cat happy and your sofa safe!
Project Idea 3: Stylish & Safe Strutting – DIY Pet Collars
Making DIY pet collars can be a fun way to give your dog or cat some personalized flair. However, when making collars, safety MUST be the number one priority. A poorly made or ill-fitting collar can be uncomfortable or even dangerous. Let’s look at some options and the crucial safety points.
Material & Design Options for Pet Collars
- Fabric Collars: These are popular and allow for lots of patterns and colors.
- Materials: Use strong, durable fabric. Cotton canvas is good. Nylon webbing (the flat woven strap material used in many store-bought collars and leashes) is very strong and durable. You’ll also need collar hardware: a sturdy D-ring (a metal ring shaped like a ‘D’) for attaching tags and a leash, and a secure buckle. Side-release plastic buckles are common and easy to use. Ensure all hardware is the right size and strength for your pet.
- How to make it (Sewn): Cut the fabric or webbing to the correct length (measure your pet’s neck loosely) plus extra for seams and folding around hardware. Fold and sew the fabric neatly around the D-ring and the two parts of the buckle, reinforcing the stitching multiple times for strength. Adjustable designs are usually best – this involves adding a slider piece to the hardware set, allowing you to change the collar length for a perfect fit. Look up specific sewing tutorials for adjustable dog collars for detailed steps.
- Paracord Collars: Paracord (parachute cord) is very strong and comes in many colors. These are often made without sewing.
- Materials: Paracord, collar hardware (buckle, D-ring), scissors, lighter (for melting cord ends to prevent fraying – adult supervision needed!).
- How to make it: These collars are typically made by braiding or knotting the paracord. The “cobra knot” or “cobra weave” is a very common and sturdy method. You’ll attach the cord to the buckle parts first, integrate the D-ring partway through the weave, and then create the length of the collar with the chosen knotting technique. The ends need to be melted carefully and pressed flat to secure them (this part requires caution). Again, looking up specific “paracord dog collar tutorial” videos is highly recommended to learn the knots correctly and how to integrate the hardware securely. Crucially, ensure the finished collar is the right thickness and flatness to be comfortable and that the hardware is attached in a way that can withstand pulling.
CRUCIAL Safety Focus for DIY Pet Collars
This is the most important part of making DIY pet collars. Never compromise on safety for looks. Considering overall pet safety at home includes ensuring accessories like collars don’t pose unexpected risks.
- Use Strong, Appropriate Hardware: Don’t skimp here.
- D-Rings: Must be strong enough to handle leash pulling without bending or breaking. Choose welded D-rings for extra strength, especially for larger or stronger dogs.
- Buckles: The buckle must close securely and not pop open easily. For dogs, sturdy side-release buckles made for collars are generally reliable. Ensure the buckle’s strength rating is appropriate for your dog’s size and pulling habits. Metal buckles can also be used but ensure they are designed for pet collars. NEVER use craft buckles or fasteners not intended for pet wear.
- Ensure Proper Fit – The Two-Finger Rule: A collar must fit correctly to be safe and effective.
- How to check: You should be able to comfortably slip two fingers side-by-side between the collar and your pet’s neck.
- Too Tight: A collar that’s too tight can restrict breathing, cause choking, or irritate the skin.
- Too Loose: A collar that’s too loose can easily slip off over the pet’s head (meaning lost ID tags or escaping from a leash) or get caught on objects, posing a strangulation risk. Regularly check the fit, especially on growing puppies or kittens.
- Breakaway Clasps are ESSENTIAL for Cats: This is non-negotiable for feline safety.
- WHY IT’S CRUCIAL: Cats are explorers and climbers. They can easily get their collars snagged on things like tree branches, fences, or even furniture. If a cat collar does *not* have a breakaway clasp, the cat can panic, struggle, and tragically strangle themselves.
- What it is: A breakaway clasp (or safety buckle) is specifically designed to pop open under a certain amount of pressure (like the cat’s weight pulling against it). This releases the cat if they get caught.
- Rule: ALL cat collars MUST have a functional breakaway clasp. Standard buckles used for dog collars are extremely dangerous for cats. When buying hardware or making a cat collar, ensure it explicitly states it’s a “breakaway” or “safety” clasp designed for cats. Test it to make sure it releases with a firm tug.
- Avoid Choking Hazards and Irritants: Keep add-ons safe.
- Decorations: Be very careful with adding things like bells, charms, or beads. If they can be chewed off, they become a serious choking hazard or could cause an internal blockage if swallowed. If you add decorations, ensure they are very securely attached (sewn tightly, not just glued) and made of non-toxic material. Consider if the benefit outweighs the risk.
- Sharp Edges: Make sure there are no rough seams, melted cord ends, or parts of the hardware that could rub or irritate your pet’s skin.
- Sources: Hiro + Wolf, Glad Dogs Nation
While making stylish DIY pet collars is fun, safety must always come first. Double-check your work, use the right materials, ensure the fit is perfect, and always use breakaway clasps for cats.
Project Idea 4: Engaging Entertainment – How to Make Pet Toys at Home
Playtime is essential for a pet’s physical health and mental well-being. Learning how to make pet toys at home is a fantastic way to provide fun, save money, and recycle materials. Here are some simple ideas for dogs and cats, along with vital safety rules.
Simple Dog Toy Ideas
Dogs love to chew, tug, chase, and figure things out. These DIY toys cater to those instincts:
- Braided Rope Toy: Great for tug-of-war and satisfying chewing.
- What you need: Old t-shirts (cotton works well), fleece fabric scraps, or old denim jeans. Sharp scissors.
- How to make it: Cut your chosen fabric into long strips, maybe 2-3 inches wide. The longer the strips, the longer the toy. Take three (or more for a thicker toy) strips and tie a strong knot at one end. Start braiding the strips tightly together, just like braiding hair. When you reach the end, tie another strong knot. Trim any excess fabric. You can make it short or long, thick or thin, depending on your dog’s preference.
- Treat Puzzle Toy: Engages your dog’s brain and makes treat time more fun.
- Simple Bottle Puzzle: Take an empty plastic water or soda bottle. Remove the cap, dispose of it, and also remove the plastic ring around the bottle neck – these are choking hazards. Make sure the edges where you cut aren’t sharp (you can lightly sand them or carefully melt them smooth – adult job!). Cut a few holes in the sides of the bottle, large enough for small treats or kibble to fall out, but not so large they pour out instantly. Put some smelly treats inside, and let your dog roll and nudge the bottle to get the rewards. *Note: The original text mentions putting the lid back on, but removed lids are safer. I’ve adjusted this instruction.*
- Cardboard Tube Puzzle: Use empty toilet paper or paper towel tubes. Fold one end closed, put treats inside, and fold the other end closed. Let your dog figure out how to rip it open (supervise to ensure they don’t eat large amounts of cardboard).
- Muffin Tin Puzzle: Place a few treats in some of the cups of a muffin tin. Cover all the cups (even the empty ones) with tennis balls or other dog-safe toys your dog has to remove to find the hidden treats.
- Snuffle Mat: Encourages natural foraging and sniffing instincts.
- What you need: A rubber sink mat or welcome mat with holes in it (make sure it’s sturdy and doesn’t smell strongly of chemicals). Lots of fleece fabric cut into strips (about 1-2 inches wide and 6-8 inches long).
- How to make it: Take a strip of fleece and push one end through a hole in the mat and the other end through an adjacent hole. Tie a simple knot on the top side of the mat. Repeat this process, tying fleece strips through the holes all over the mat until it’s covered in a dense “shag” of fleece. Make it really full! To use it, sprinkle small, dry treats or kibble amongst the fleece strips and let your dog sniff them out.
Simple Cat Toy Ideas
Cats often enjoy toys that mimic prey – things that flutter, skitter, or crinkle.
- Wand Toy (Feather Teaser): Interactive fun for you and your cat.
- What you need: A smooth stick or wooden dowel (about 1-2 feet long). Strong string or twine. Feathers (craft feathers are okay, ensure they are clean and dye is non-toxic), fabric strips, or crinkly material (like uncoated cellophane or thick craft paper). Non-toxic glue (optional).
- How to make it: Drill a small hole near one end of the stick, or securely tie the string around the end, perhaps adding a dab of non-toxic glue under the knot to secure it. Cut the string to your desired length (maybe 2-3 feet). Securely tie your chosen items – feathers, lightweight fabric strips, crinkly paper – to the other end of the string. Make sure everything is tied very tightly so parts don’t come off during play. Wave and twitch the wand to entice your cat to chase and pounce! Always put wand toys away after playtime so the cat doesn’t chew or get tangled in the string when unsupervised.
- Crinkle Ball: Simple, noisy fun.
- What you need: Non-toxic paper (like plain brown craft paper, parchment paper, or even just a piece of printer paper – avoid heavily inked flyers). Food-safe aluminum foil can also work, but supervise closely to ensure the cat doesn’t ingest foil pieces.
- How to make it: Simply crumple the paper or foil tightly into a ball shape. Make it small enough for your cat to bat around easily. Many cats adore the crinkling sound it makes as it rolls.
- Cardboard Box Castle/Tunnel: Hours of exploration and hiding fun.
- What you need: Cardboard boxes of various sizes. A box cutter or strong scissors (adult use recommended). Packing tape (optional, use sparingly on the outside).
- How to make it: Get creative! Cut door holes and window openings into the boxes. Connect multiple boxes together using more holes or by carefully taping edges on the *outside* only (where the cat is less likely to chew). You can create tunnels, towers, and hideaways. Cats love exploring enclosed spaces. Make sure all cut edges are reasonably smooth.
Key Safety Considerations for Homemade Pet Toys
When learning how to make pet toys at home, safety is paramount.
- Material Choice Matters: Always use materials you know are safe and non-toxic. Avoid fabrics with loose glitter, heavily dyed materials where the color might run or be ingested, or anything with a strong chemical smell. Natural materials are often a good bet.
- AVOID Small or Swallowable Parts: This is incredibly important. Do not use buttons, plastic googly eyes, small beads, bells (unless they are securely enclosed inside the toy), loose yarn, thin string (unless on a supervised wand toy), rubber bands, or any small plastic or metal pieces that could be chewed off and swallowed. These can cause choking or dangerous internal blockages requiring surgery. Keep designs simple and sturdy.
- Supervision is Key, Especially at First: Always watch your pet closely the first few times they play with any new toy, whether homemade or store-bought. See how they interact with it. Do they try to rip it apart instantly? Are small pieces coming off?
- Regular Inspection: Check your homemade toys frequently for signs of wear and tear – ripped seams, loose parts, fraying fabric.
- Discard When Damaged: If a toy becomes damaged, throw it away immediately. It’s better to be safe than sorry. A damaged toy can quickly become hazardous.
- Sources: Netmeds, Dr. Pashu, CPR Certification Now
Making toys is fun, but safe play is the goal. Keep these points in mind, and you can provide hours of safe enrichment for your furry companion!
General Tips for DIY Pet Accessory Success
Whether you’re making a bed, scratcher, collar, or toy, following some general guidelines will help ensure your DIY pet accessory projects are successful, safe, and enjoyable for both you and your pet.
- Choose Your Materials Wisely: The foundation of any good DIY project is the right material.
- Safety First: Always prioritize non-toxic materials. If painting or gluing, use pet-safe options and allow them to cure fully in a well-ventilated area before giving the item to your pet. Ensuring your crafting area and materials are safe is part of creating a pet-friendly home.
- Durability Matters: Consider your pet’s habits. A gentle senior dog needs different materials than a large, boisterous puppy who loves to chew. Choose fabrics, ropes, and woods that can withstand your pet’s level of interaction.
- Comfort Counts: Think about texture and softness, especially for beds and collars. Avoid itchy or rough materials against your pet’s skin.
- Hypoallergenic & Natural: Where possible, consider natural materials like organic cotton, hemp, or wool. These are often gentler on sensitive skin, biodegradable, and better for the environment.
- Sources: Hiro + Wolf, Honest Pet Products
- Measure Accurately – Twice! Getting the size right is crucial for comfort and safety.
- Beds: Measure your pet while they sleep in their usual position (curled or stretched) and add extra inches for comfort.
- Collars: Measure your pet’s neck snugly but not tightly, then use the “two-finger rule” for the final fit. Remember, adjustable designs are often best.
- Scratchers: Ensure posts are tall enough for a full stretch and bases are wide enough for stability.
- Start Simple If You’re a Beginner: Don’t feel pressured to tackle a complicated project first.
- Easy Wins: Projects like the no-sew fleece bed, cardboard scratch pads, or simple t-shirt rope toys are great starting points.
- Build Confidence: Success with simpler projects will give you the confidence and skills to try more complex crafting later on, like sewing or basic woodworking.
- Prioritize Safety Above ALL Else: We’ve mentioned it before, but it’s worth repeating! Pet safety should guide every decision you make.
- Check Thoroughly: Before giving any DIY item to your pet, inspect it carefully. Are there any sharp edges (wood splinters, staple points, sharp plastic)? Are there any small parts that could be chewed off and swallowed? Could your pet get tangled in strings or loops?
- Test Durability: Give the item a good tug or squeeze. Does it seem sturdy? Will it hold up to your pet’s play style?
- Think Like Your Pet: Try to anticipate how your pet might interact with the item. Could they chew through it quickly? Could they get stuck? If in doubt, err on the side of caution.
- Embrace Eco-Friendly Practices: Making DIY pet accessories is a perfect opportunity to be kind to the planet.
- Repurpose & Upcycle: Look around your home for items you no longer need. Old clothes, towels, blankets, cardboard boxes, plastic bottles (with safety modifications), and even wood scraps can all be given a second life as pet accessories.
- Reduce Waste: By using what you already have, you’re reducing the demand for new products and keeping items out of the landfill. It’s a win-win for your wallet and the environment.
- Sources: Gimars Pet, Honest Pet Products
Follow these tips, and you’ll be well on your way to creating wonderful, safe, and well-loved homemade items for your furry family members.
Conclusion: Get Crafting for Your Happy Pet!
Creating DIY pet accessories is so much more than just making stuff. It’s a truly rewarding way to pour your love and creativity into something special for your furry companion. Seeing them enjoy an item you made with your own hands brings a unique kind of joy.
As we’ve explored, the benefits are clear:
- It’s fun and fulfilling for you, the creator.
- It saves money compared to constantly buying new items.
- It allows perfect customization for your pet’s specific needs and personality.
- It gives you control over materials, ensuring they are safe and non-toxic.
- It strengthens the bond you share with your pet.
- It can be an eco-friendly choice, reducing waste through repurposing.
From cozy beds and satisfying scratchers to safe collars and engaging toys, there’s a DIY project out there for every skill level and every type of pet. We hope these ideas and tips have inspired you to get crafty!
Don’t be afraid to start simple and let your creativity shine. Your pet won’t judge your crafting skills – they’ll just appreciate the love and effort you put into making something just for them.
So, gather some materials, pick a project, and start creating! You’ll provide your pet with something unique and useful, and you might just discover a wonderful new hobby for yourself.
Which DIY pet accessory project will you try first? Share your own DIY pet creations or ideas in the comments below – we’d love to see them!
Frequently Asked Questions (FAQ)
What are the safest materials for DIY pet toys?
Focus on non-toxic, durable materials. Good options include sturdy fabrics like denim or canvas, natural fibers like cotton or hemp (for rope toys), untreated wood (sanded smooth), and durable rubber designed for pets. For cats, sisal rope and corrugated cardboard are excellent choices. Always avoid small, swallowable parts, flimsy plastics, strings/yarn (except supervised wand toys), and materials treated with harsh chemicals or dyes.
Why is a breakaway collar essential for cats?
Cats are agile climbers and explorers. Their standard collars can easily get snagged on branches, fences, or furniture. A breakaway collar has a special clasp designed to pop open under pressure (like the cat’s weight if caught), preventing strangulation. Never use a standard buckle collar on a cat.
How do I make sure my DIY scratching post is stable?
Stability is crucial so the post doesn’t tip over and scare your cat. Use a heavy, wide base (e.g., a thick piece of plywood at least 12×12 inches, or wider for taller posts). Secure the post firmly to the center of the base using long screws from underneath. Test it by pushing and pulling on it – it shouldn’t wobble significantly.
Can I use old clothes to stuff a DIY dog bed?
Yes, using clean, old clothes, towels, or blankets is a great eco-friendly stuffing option! Just make sure to cut them into smaller pieces first. This prevents them from bunching up unevenly inside the bed and makes the stuffing more comfortable and supportive.
How often should I check homemade pet toys for damage?
Check homemade toys frequently, ideally before or after each play session, especially if your pet is a strong chewer. Look for any signs of wear and tear: ripped seams, loose threads, fraying fabric, cracks in wood or plastic, or any parts becoming detached. Discard any damaged toys immediately, as they can become choking or ingestion hazards.